
tarotmama
Hi all! Hope it's okay to post this here like this (if not, mods, just remove it!). Anyway, I've become addicted to watching movies on netflix at night and it's nice to crochet while I'm doing that, so I've been working on several tarot pouch patterns and I thought I'd share them all as I get the kinks worked out of the patterns and post them all in one thread.
Now some disclaimers: I am NOT a pattern designer. I've only written out a few patterns before so I will do my best to explain something that doesn't make sense!
I'm happy for you to use my patterns to make bags for yourself/friends/etc. But please don't use my patterns to make bags for sale (because I'm selling them!!).
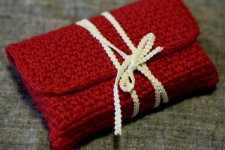
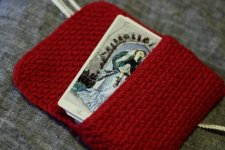
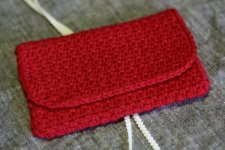
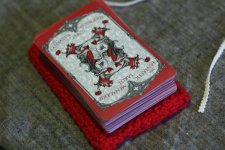
The first bag is what has become (so far) my IDEAL tarot pouch. It's soft, protective, no fiddly drawstring, decorative, lush, etc., etc. I used a "woven stitch" on the pattern to basically make a wallet type pouch. You could certainly add a button hole easily to this pattern, but I prefer to just wrap a chord around my bag.
I designed this pouch for my Fantastic Menagerie tarot and it should fit smaller decks too. For really tall cards (like the Deviant Moon, for example) it's kind of a tight fit. I can help you change the pattern for it.
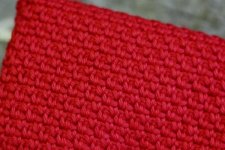
I'm using a very soft cotton yarn. I guess you would call it "worsted" weight. It is softer than dishcloth cotton, and not as dense. You could probably use dishcloth cotton, but the bag might be a little tighter.
I use a size G hook. If you want a bigger bag, consider using a H or I.
Pictures are attached at the bottom!
Here's the pattern:
1 - ch 36
2 - sk 2ch, sc in next, *ch1, sk 1 ch, sc in next*, repeat till end, ch2 turn
3 - sc in ch1 space from the previous row, *ch1, sk 1 ch, sc in ch space from previous row* repeat till end (sc in the turning ch2 from the previous row), ch2 turn
Keep making rows like that (repeating row 3). Eventually start folding the fabric over on itself until you have a pocket as deep as you'd like it. Then keep repeating rows until you have a flap as long as you'd like it. I don't count how many rows I make. I just make it till it looks right.
To make the rounded end of the flap, you will add 3 rows like this:
Instead of ch2 at the end of the previous row, just ch1 (so that you don't have a turning space to sc in on top of). When you get to the end of the row, between the last ch1 space from the previous row and the ch2 from the previous row, DO NOT ch1 in between, just sc in each (to decrease a stitch). ch1 and start a new row in the next ch1 space between two sc.
Fasten off. I made the pouch by using a tapestry needle and sewing up the sides of the bag (turn it inside out first) and then I made a sc border around the flap. Weave in your ends.
You could make a chord to attach to your bag easily enough. I found a piece of creamy trim and thought it looked really pretty with my FM deck, so that's what I'm using. I like the chord on my bag to be not attached because I can wrap it several times around the bag for added security.
It's a beautiful stitch and only takes a few hours to work up! Let me know if you have any problems with it and I'll do my best to explain or even take photos on how to make the stitches!
I'm working on getting the kinks out of another pattern and I'll post it later!
ETA::
SECOND PATTERN: http://www.tarotforum.net/showpost.php?p=2108491&postcount=46
Now some disclaimers: I am NOT a pattern designer. I've only written out a few patterns before so I will do my best to explain something that doesn't make sense!
I'm happy for you to use my patterns to make bags for yourself/friends/etc. But please don't use my patterns to make bags for sale (because I'm selling them!!).
The first bag is what has become (so far) my IDEAL tarot pouch. It's soft, protective, no fiddly drawstring, decorative, lush, etc., etc. I used a "woven stitch" on the pattern to basically make a wallet type pouch. You could certainly add a button hole easily to this pattern, but I prefer to just wrap a chord around my bag.
I designed this pouch for my Fantastic Menagerie tarot and it should fit smaller decks too. For really tall cards (like the Deviant Moon, for example) it's kind of a tight fit. I can help you change the pattern for it.
I'm using a very soft cotton yarn. I guess you would call it "worsted" weight. It is softer than dishcloth cotton, and not as dense. You could probably use dishcloth cotton, but the bag might be a little tighter.
I use a size G hook. If you want a bigger bag, consider using a H or I.
Pictures are attached at the bottom!
Here's the pattern:
1 - ch 36
2 - sk 2ch, sc in next, *ch1, sk 1 ch, sc in next*, repeat till end, ch2 turn
3 - sc in ch1 space from the previous row, *ch1, sk 1 ch, sc in ch space from previous row* repeat till end (sc in the turning ch2 from the previous row), ch2 turn
Keep making rows like that (repeating row 3). Eventually start folding the fabric over on itself until you have a pocket as deep as you'd like it. Then keep repeating rows until you have a flap as long as you'd like it. I don't count how many rows I make. I just make it till it looks right.
To make the rounded end of the flap, you will add 3 rows like this:
Instead of ch2 at the end of the previous row, just ch1 (so that you don't have a turning space to sc in on top of). When you get to the end of the row, between the last ch1 space from the previous row and the ch2 from the previous row, DO NOT ch1 in between, just sc in each (to decrease a stitch). ch1 and start a new row in the next ch1 space between two sc.
Fasten off. I made the pouch by using a tapestry needle and sewing up the sides of the bag (turn it inside out first) and then I made a sc border around the flap. Weave in your ends.
You could make a chord to attach to your bag easily enough. I found a piece of creamy trim and thought it looked really pretty with my FM deck, so that's what I'm using. I like the chord on my bag to be not attached because I can wrap it several times around the bag for added security.
It's a beautiful stitch and only takes a few hours to work up! Let me know if you have any problems with it and I'll do my best to explain or even take photos on how to make the stitches!
I'm working on getting the kinks out of another pattern and I'll post it later!
ETA::
SECOND PATTERN: http://www.tarotforum.net/showpost.php?p=2108491&postcount=46
")