Kiama
Making your own Rune set
What can they be made out of?
I have seen many different materials used to create a set of Runes, and it is entirely up to the person who will be owning and using the Rune set as to what they use. The most common technique I have seen, and one I subsribed to myself initially, is to buy a set, already made. Some of these sets are beautiful, and mae great gifts for others. I have seen some absolutely stunning sets made og gold, jade, amethyst, and sets which use a different crystal for each Rune. I have also seen sets which are plainer, but still as beautiful, some using different woods for each Rune, some using stone, some clay. All are equally beuatiful, useful, and easy to use, except they come at a very high price on ocassions.
Some of the hand-made sets I have come across include glass nuggets, sea-shells, pebbles from a beach, wooden sets, bone or antler sets, and even paper sets! (Umbrae, I'm not really a heretic!") ) They really can be made using anything, and usually the materials can be found in your natural surroundings.
) They really can be made using anything, and usually the materials can be found in your natural surroundings.
However, some materials are more practical than others! It is difficult to always carry a set of pebble Runes, as they can grow heavy after a while, whilst wooden Runes tend to be lighter. Storage may also be something to think about: Will the Runes you carry with you be under pressure? Maybe they'll be kept in a briefcase amongst other objects which might crush or damage seashell Runes or glass Runes? Durability is also an issue, so if you plan to make wooden Runes, you will need to take some precautions during the making process in order to make sure they stay healthy, and looking good as new! Some authors suggest that if you are going to use wood to make your Runes, you should cut it off a living tree, and make sure the tree you cut it off is a fruit-bearing tree. (Apple, yew, pine, cedar, redwood, olive, peach, pear, cherry.) They say this because a fruit-bearing tree will give your Runes a more fruitful air to them, and your readings will be more accurate, your bond with your Runes more enjoyable, and so on and so forth... They also say not to take the branch if it is dead, because the Runes then are not 'alive'... However, this is up to you. I know many a person who would object to cutting the branch of a living tree, ad would prefer to gather the branches off the ground.
How do I make a set of Runes?
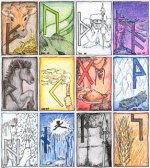
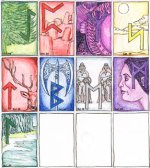
If you are going for the paper option, it couldn't be easier! Its simply a case of getting 24 small slips of paper, and writing in ink the Runes, one Rune to each slip. However, if you want to go further with this, you could make Rune Cards. There are quite a few sets of Rune Cards available to buy, Ralph Blum's being the most famous right now. Basically, you just go one step further, and ullstrate the slips of paper with pictures having some reference to the meaning of each Rune, much like you would a Tarot card!
If you want to make Runes out of pebbles, sea-shells, crystals, or glass nuggets, you would do best not to carve in the symbols, as you would do with bone, antler, or wood, as you may crack the materials you are using. In this case, you may want to buy one of those gold or silver marker pens, and write a Rune on each of the stones, shells, crystals, nuggets. Then, when the ink is dry, you might want to varnish them to prevent the ink from scratching off due to overuse.
To make wooden Rune sets, it is alot more difficult, but the Runes themselves are more durable, as they actually have the symbols inscribed into them. To do this Rune set, here is what you'll need:
- A branch of wood, whtaever wood you choose.
- A small saw to cut the rune disks, possibly an electric jig saw or table saw.
- A clamp or vice for holding the Runes in place
- A tool for cutting the Rune symbols, possibly a chisel point carving knife, X-acto blade, screwdriver, wood-carving chisel, anything that cuts!
- Medium and fine sand paper
- Fine steel wool
- Reddening dye to colour the Runes. (Optional) If you do want this, then you could use the red pigment from tiver, minium, red india ink, red candle wax, dragon's blood resin, red jeweller's rouge, or red enamel paint. If you mix a little gold metallic paint with the reddening dye, you will get a shimmer on each Rune! (Yeah! Sparkles!) To be more traditional, for the red pigment, just prick your finger and let the blood act as the reddening agent. Of course, this is optional, and is not to everyone's taste.
- Linseed, lemon, walnut, or olive oil.
- A rag to apply the oil.
- Something to place the Runes on after they are reddened
- A sturdy, wide-mouthed Rune bag to put your Runes in when you are done. This can be made of any material, although natural fibres are often preferred. I have seen cotton, velvet, hessian, and so on... It sentirely up to you.
- Time. About 3 hours in total, so you might consider doing 8 Runes in one go, then another 8, then the last 8... There is no real rush! And we can't have you making mistakes cuz you were tired and thristy...
Okay, you've got all the stuff. You've gathered it all into one place, and you've got your time free, with no distractions. Now you can make the Runes!
1) First, you need to cut the Rune disks. Cut 24 (Or more to allow for mistakes!) half-inch (1.25 cm) thick rounds from the branch
2) If you want to, you can make a ritual out of it. If so, do your ritual thing now!
3) Sand all the surfaces of each of your disks. (I recommend cutting 30 disks, esp. if you are a beginner!) Start sanding with medium grade sandpaper, then fine sandpaper, and smooth out any corners, bumps, and protruding bits.
4) Carefully pencil the 24 Runes onto the disks, drawing the symbols against the grain of the wood. This means you stand less chance of splitting the disks when you carve them. You could, at this opint, chant the Rune name as you draw it.
5) Put the first disk in the vice or clamp, and make sure it is secured in there tightly.
6) Now, carefully either carve the ymbol into the wood, or burn it in with a woodburning tool.
7) Use fine steel wool to remove any rough edges left over from the carving.
8) Remove any pencil marks with a soft rubber. (That's an eraser for all you Americans!)
9) When done with that Rune, place it on a cloth, and complete the other Runes.
10) If you have chosen the option to redden your Runes, this is the time to do it. Start with the first disk you craved, and redden each part of the disk. Set the disk onto the cloth to dry.
11) Do this too all the disks.
12) To give your Runes a soft, satin finish, mix quater of a cup of olive oil with 24 drops of lemon oil. Maybe you would like to add a few drops of any essential oil in too. Stir thes eoils into an the olive-oil base. Work the oil into each rune with a rag. You might want to meditate on each Rune's meaning whilst you are doing this. You might want to sing to each Rue whilst you're doing this too! Its entirely up to you what you do behind closed doors!
13) Buff them all to a oft, satin finish!
14) Apply linseed oil to one side of each Rune and let it dry, then the other side of each Rune and let it dry. You could do this once a year, as it keeps the Runes sealed, and prevents cracking.
15) Now, you have your wooden Rune set! You can do this with stone Runes, although you will need lots of stones cuz you may end up cracking them if you do. You will also need different cutting tools if you plan on using stone. Also, be aware that with stone Runes, the reddening with wear off quite quickly through use, compared to wooden Runes. You could do this same process quite effectively with bone and antler too, so go for it!
To be continued...
What can they be made out of?
I have seen many different materials used to create a set of Runes, and it is entirely up to the person who will be owning and using the Rune set as to what they use. The most common technique I have seen, and one I subsribed to myself initially, is to buy a set, already made. Some of these sets are beautiful, and mae great gifts for others. I have seen some absolutely stunning sets made og gold, jade, amethyst, and sets which use a different crystal for each Rune. I have also seen sets which are plainer, but still as beautiful, some using different woods for each Rune, some using stone, some clay. All are equally beuatiful, useful, and easy to use, except they come at a very high price on ocassions.
Some of the hand-made sets I have come across include glass nuggets, sea-shells, pebbles from a beach, wooden sets, bone or antler sets, and even paper sets! (Umbrae, I'm not really a heretic!
) They really can be made using anything, and usually the materials can be found in your natural surroundings. However, some materials are more practical than others! It is difficult to always carry a set of pebble Runes, as they can grow heavy after a while, whilst wooden Runes tend to be lighter. Storage may also be something to think about: Will the Runes you carry with you be under pressure? Maybe they'll be kept in a briefcase amongst other objects which might crush or damage seashell Runes or glass Runes? Durability is also an issue, so if you plan to make wooden Runes, you will need to take some precautions during the making process in order to make sure they stay healthy, and looking good as new! Some authors suggest that if you are going to use wood to make your Runes, you should cut it off a living tree, and make sure the tree you cut it off is a fruit-bearing tree. (Apple, yew, pine, cedar, redwood, olive, peach, pear, cherry.) They say this because a fruit-bearing tree will give your Runes a more fruitful air to them, and your readings will be more accurate, your bond with your Runes more enjoyable, and so on and so forth... They also say not to take the branch if it is dead, because the Runes then are not 'alive'... However, this is up to you. I know many a person who would object to cutting the branch of a living tree, ad would prefer to gather the branches off the ground.
How do I make a set of Runes?
If you are going for the paper option, it couldn't be easier! Its simply a case of getting 24 small slips of paper, and writing in ink the Runes, one Rune to each slip. However, if you want to go further with this, you could make Rune Cards. There are quite a few sets of Rune Cards available to buy, Ralph Blum's being the most famous right now. Basically, you just go one step further, and ullstrate the slips of paper with pictures having some reference to the meaning of each Rune, much like you would a Tarot card!
If you want to make Runes out of pebbles, sea-shells, crystals, or glass nuggets, you would do best not to carve in the symbols, as you would do with bone, antler, or wood, as you may crack the materials you are using. In this case, you may want to buy one of those gold or silver marker pens, and write a Rune on each of the stones, shells, crystals, nuggets. Then, when the ink is dry, you might want to varnish them to prevent the ink from scratching off due to overuse.
To make wooden Rune sets, it is alot more difficult, but the Runes themselves are more durable, as they actually have the symbols inscribed into them. To do this Rune set, here is what you'll need:
- A branch of wood, whtaever wood you choose.
- A small saw to cut the rune disks, possibly an electric jig saw or table saw.
- A clamp or vice for holding the Runes in place
- A tool for cutting the Rune symbols, possibly a chisel point carving knife, X-acto blade, screwdriver, wood-carving chisel, anything that cuts!
- Medium and fine sand paper
- Fine steel wool
- Reddening dye to colour the Runes. (Optional) If you do want this, then you could use the red pigment from tiver, minium, red india ink, red candle wax, dragon's blood resin, red jeweller's rouge, or red enamel paint. If you mix a little gold metallic paint with the reddening dye, you will get a shimmer on each Rune! (Yeah! Sparkles!) To be more traditional, for the red pigment, just prick your finger and let the blood act as the reddening agent. Of course, this is optional, and is not to everyone's taste.
- Linseed, lemon, walnut, or olive oil.
- A rag to apply the oil.
- Something to place the Runes on after they are reddened
- A sturdy, wide-mouthed Rune bag to put your Runes in when you are done. This can be made of any material, although natural fibres are often preferred. I have seen cotton, velvet, hessian, and so on... It sentirely up to you.
- Time. About 3 hours in total, so you might consider doing 8 Runes in one go, then another 8, then the last 8... There is no real rush! And we can't have you making mistakes cuz you were tired and thristy...
Okay, you've got all the stuff. You've gathered it all into one place, and you've got your time free, with no distractions. Now you can make the Runes!
1) First, you need to cut the Rune disks. Cut 24 (Or more to allow for mistakes!) half-inch (1.25 cm) thick rounds from the branch
2) If you want to, you can make a ritual out of it. If so, do your ritual thing now!
3) Sand all the surfaces of each of your disks. (I recommend cutting 30 disks, esp. if you are a beginner!) Start sanding with medium grade sandpaper, then fine sandpaper, and smooth out any corners, bumps, and protruding bits.
4) Carefully pencil the 24 Runes onto the disks, drawing the symbols against the grain of the wood. This means you stand less chance of splitting the disks when you carve them. You could, at this opint, chant the Rune name as you draw it.
5) Put the first disk in the vice or clamp, and make sure it is secured in there tightly.
6) Now, carefully either carve the ymbol into the wood, or burn it in with a woodburning tool.
7) Use fine steel wool to remove any rough edges left over from the carving.
8) Remove any pencil marks with a soft rubber. (That's an eraser for all you Americans!)
9) When done with that Rune, place it on a cloth, and complete the other Runes.
10) If you have chosen the option to redden your Runes, this is the time to do it. Start with the first disk you craved, and redden each part of the disk. Set the disk onto the cloth to dry.
11) Do this too all the disks.
12) To give your Runes a soft, satin finish, mix quater of a cup of olive oil with 24 drops of lemon oil. Maybe you would like to add a few drops of any essential oil in too. Stir thes eoils into an the olive-oil base. Work the oil into each rune with a rag. You might want to meditate on each Rune's meaning whilst you are doing this. You might want to sing to each Rue whilst you're doing this too! Its entirely up to you what you do behind closed doors!
13) Buff them all to a oft, satin finish!
14) Apply linseed oil to one side of each Rune and let it dry, then the other side of each Rune and let it dry. You could do this once a year, as it keeps the Runes sealed, and prevents cracking.
15) Now, you have your wooden Rune set! You can do this with stone Runes, although you will need lots of stones cuz you may end up cracking them if you do. You will also need different cutting tools if you plan on using stone. Also, be aware that with stone Runes, the reddening with wear off quite quickly through use, compared to wooden Runes. You could do this same process quite effectively with bone and antler too, so go for it!
To be continued...